As we know windows have many hidden programs, today I introduce you Private Character Editor(PCE). PCE Helps you to create own fonts on windows. PCE is a small windows program look like MS Paint. PCE provides basic drawing tools for creating and editing those
characters, along some advanced options.Using this program you can able to create own fonts or character on windows. But Font created with this tool is system dependable and you can not use this on another machine. An ‘out of sight’ program, it is used in conjunction with the Character Map. Through the PCE you can make your own characters and insert them into documents using the Character
Map.

So, just follow below steps to create own fonts/character :
How to use Your newly created Characters :
The process is the same as when using any other character. Open any application and access the Character Map through
For XP :
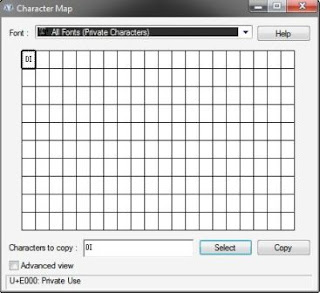 The newly character can be found in the dropdown under All Fonts (Private Characters)
or under a specific font (private characters) depending upon the choice
of association in Step 7. Select the character and hit copy. Now it can
be pasted into any application.
The newly character can be found in the dropdown under All Fonts (Private Characters)
or under a specific font (private characters) depending upon the choice
of association in Step 7. Select the character and hit copy. Now it can
be pasted into any application.

So, just follow below steps to create own fonts/character :
- To start the Private Character Editor, click the Start menu, and then click Run (or the Windows Key & R). In the Open box, type C:\WINDOWS\system32\eudcedit.exe
- PCE starts with a Select Code Window. This window
associates the character you are about to create with a particular
position in the Windows character library. The funny numbers are
hexadecimal codes that will be allotted to your new character. Select
any of the little grey boxes and click on OK.
Note: By default, PCE uses the Unicode character set. - The interface is a grid drawing area and the drawing toolbar on the left. You can also access the drawing tools from the “˜Tools’ menu.
- The grid represents the total area of a character measuring 50 x 50. Each character that you draw becomes a black and white bitmap (*.bmp).
- The drawing area is simple enough for a third grader to understand but the actual drawing takes a calligraphist’s hand. The illustration below shows that I am certainly not one. It takes a lot to use the mouse as a brush. Use the left mouse button to draw in black and the right one for white. But I found the best thing to be the ability to copy and paste the bitmap selections between PCE and other bitmap drawing programs like Paint.
- You can also use an existing character as a template to create a new character. Simply copy the existing character to the grid (Edit Copy Character) and then change it with the tools. The existing character can also be used as a visual guide in a Reference window next to the Edit Grid (Window Reference).
- When finished with the new character, you have two options – associate the new character with a particular font family or with all fonts installed in your computer. For a specific font family, your custom character will be available exclusively from there.
- The final step is of course to save your hardwork! (Edit Save Character or Save Character As…) The character gets saved into the position chosen in the Select Code Window. To save into a different position use Save Character As


How to use Your newly created Characters :
The process is the same as when using any other character. Open any application and access the Character Map through
For XP :
- Click Start, point to All Programs, point to Accessories, point to System Tools, and then click Character Map.
- Click Accessories, then System Tools folder to access the Character Map.
- Alternatively, Click Start, then the Run dialog…type in charmap.exe; hit OK.


{ 0 comments... read them below or add one }
Post a Comment